
Written by Jill Zwarensteyn, Editor
There are few inventions more convenient than an air mattress when it comes to hosting the occasional houseguest in a cramped apartment or enjoying the great outdoors as a glamper. Conversely, there is almost nothing worse than that “sinking” feeling when one suddenly awakes, flat on terra firma, surrounded by the squishy remains of a leaky air bed. Fortunately, there are many fixes for this deflating situation!
Learn More: Why Do Air Mattresses Deflate?
No matter the solution, here are a few universal prep steps:
- Confirm that there is a leak; sometimes temperature change, or a new mattress that hasn’t had the chance to fully expand will lose air. Re-inflate and see if the same situation occurs.
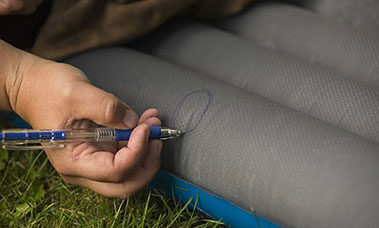
- If there is a pinhole, rip or tear; locate it. This is easier said than done. Position the blow-up mattress up against a wall with the bottom facing you, as this is where the majority of holes will be found. Also, check seams. If the leak is elusive, you can feel for the leak, listen for escaping air, or run a soapy sponge along the surface, looking for telltale bubbles to emerge where the leak is.
- Once the leak has been located, mark it with a permanent marker and thoroughly clean the area, allowing it to dry completely before continuing.
- If the mattress has a flocked or textured surface, gently sandpaper the area of the leak, exposing the flat vinyl surface and creating a flat expanse to affix the patch material.
Once you have finished these prep steps, there are several repair techniques you can choose from, depending on your circumstances.
- Use the patch kit that came with the mattress. This is great advice if you can actually find the patch kit. I classify this advice with the same well-intentioned suggestion to “replace the button you’ve lost with the one that came with the shirt you bought eight months ago”. Sensible but usually an impossibility! Alternatively, there are air mattress patch kits that you can purchase if you have the time to look.
- Purchase a bike tire patch kit. There are arguments for and against the self-adhesive patches that come with some of these kits, but basically, if the patch can stand up to the pressure of being ridden on, it will be more than sufficient for an inflatable bed.
- Make your own patch from a shower or pool liner. Any thin plastic material will work. When making your own patch, be sure to make it big enough so that it completely covers the leaky area and actually overlaps it to ensure air tightness. Use super glue, gorilla glue, contact or rubber cement, or even epoxy as your adhesive. In other words, no. Your kid’s school glue isn’t going to work!
- Use hot glue to fill in a tear along the seam. Caution! Be careful when applying the hot glue not to let the tip of the glue gun make contact. Otherwise, you will melt the air mattress and have a much bigger problem.
- In a pinch, use squares cut out of a t-shirt, applying gorilla glue both to the surface area of the leak and to the cloth square before adhering them together.
Video Instructions
Finally, as a temporary measure, there’s always duct tape. The glue on the tape will eventually wear out, so only use this method until you have the ability to replace it with a more permanent fix; and be sure to clean off all the residue from the tape before applying a patch.
Good luck and sleep tight!
Additional Resources
Jill Zwarensteyn
Editor
About Author
Jill Zwarensteyn is the Editor for Sleep Advisor and a Certified Sleep Science Coach. She is enthusiastic about providing helpful and engaging information on all things sleep and wellness.
Combination Sleeper